Wednesday 11 November 2015

Quick Hack to tick Collars

Not a DIY agility equipment post, but i think will be nice to point this out.

Tick collars are great in keeping your dogs tick free, however, most will require your dogs to wear it 24 hours a day. The big concern with having your dog wear a collar 24x7 is that they may strangle themselves if it is caught on something.

A quick way to get around this is just do a cut on the collar, and leave a portion to hold it back.

I will use an old or expired tick collar to try various depth to determine the depth to cut before i make the cut on the new collar.

Another way that we can make it safe is to simply attached the tick collar to a break-away collar.

What i have done is to cut the buckle off the tick collar and use strings to tie it to the break-away collar.


Hope the tips will help keep things safe for your dogs....


Thursday 29 October 2015

Making Wing Jumps without going to the hardware shop

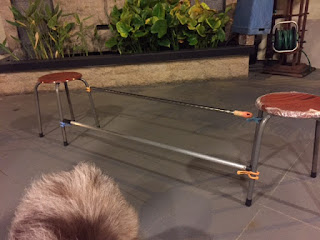
Decided to make a wing jump out of ordinary household items. First cloth pegs to use in place of jump cups.

next, 2 stools, and broomstick and we are done with our simple winged jump....:)

Add another broom stick and pair of clothes pegs and you can even have a spread jump!


There you have it....simple winged jumps....:P


Note: If your broom stick is the metal kind, it be idea if you train on grass or to put a carpet beneath.


Wednesday 28 October 2015

Joining 2 pipes

Decided to cut my jump bars to 2 so i can pack them into smaller bags.

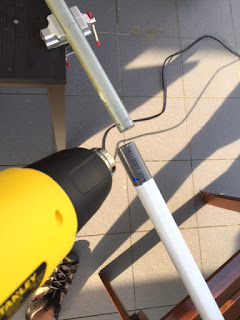
But silly me, forgotten to check my stock of pipe joiner. A little to lazy to drive to the hardware shop for one, so a little hack to make my own PVC joint.

Simply heat up one end of the PVC pipe and while it's in a rubbery stage, slide it over a metal pipe or rod of the same diameter.


You could also use the other half of the pvc pipe, but you may have to work relatively fast to prevent heat from affecting both pipes. I am using a heat gun for this, but you could also heat it over an oven. Do keep your works pace well ventilated .

End result is a surprising nice fit, better then buying a PVC pipe joint. All that needs to be done is to wrap it in cloth tape of the nice finish.


 While we are on the subject of jump bars, weighted jump bar seems to be the trend. Most people will simply put sands into PVC pipes and seal of with end-cap. There is a simpler way, when buying PVC pipes, just look for those thick walled type.


You may want to take note that under USDAA  specifications , jump bar should not exceed 0.5 lbs per foot. and bars should be between 4.5 to 5 feet long. Whatever the length, the jump bar must not exceed 2.5 lbs or 1.13KG. Not sure about the weight requirements for FCI, IFCS or UKI, but if anyone willing to share, just leave it in the comments below.


Monday 26 October 2015

Wingless Jump

Have some pieces of unused wood laying around, so decided to make myself the base of a wingless jump.

This is a rather simple DIY. Just cut 2 piece of wood to be about 20cm in lenght and make a middle groove about the same width as the wood you are using. For me i use a 2cm think wood.

Screw a pipe end-cap to one of the piece and you could just friction fit both piece of wood.


This should give you a rather stable base for your jump. The end results will be something like this..


I do not glue any of the pieces together except for the end-cap that is screwed in. This setup allows me to quickly assemble or tear down my equipment.

Fast packup is especially important in case you need to clear out of the training area quick. I have timed myself and was able to quickly pack up 4 sets of jump within 3 minutes....:)


Wednesday 21 October 2015

DIY 4 way pipe connector

Local plumbing shop don't seems to have 4-way connector. The only way to obtain a 4 way pipe connector is to buy from overseas (cleanrun.com, amazon or ebay). For those that are new to DIY, here is what a 4-way connector looks like...


Here is one simple way to DIY a 4 way connector for your jumps....

all you need is a 3 way connector (for T-joint), an end-cap and screw. For me I like to use those self taping screw which allows easy fixing of the screw without having first to drill holes.

The end result is a simple DIY 4-way connector for your jumps, done in less then 30 sec!

Update:
A picture of a self-taping screw is shown below. Notice the tip of the screws, it's quite useful in screw PVC without using a drill bit.


Tuesday 20 October 2015

Long Jump DIY

Welcome to Agility DIY. 


From where I am, dog agility isn't much of a mainstream dog activity. As such, most of us end up having to buy from overseas or to make one ourselves.

I have decided to start a DIY blog on making agility equipment. These could be simple components to an entire jump. If possible, I would also share out where i got my stuff and if you are in the sunny country of Singapore, I have included phone number or address of where i get the supplies.

To start of this blog, I have included a drawing of a long jump below. As far as i know, this dimension should be close to the requirements of USDAA and UKI.


The above measurements are in cm. I would recommend that the thickness of the wood to be at least 2cm for stability. You should be able to obtain materials from any wood working shops, most will also provide cut to specification services and so all you need to do is nail it all together. If you are in Singapore, just visit the workshops around defu lanes. They provide quite good and prompt services.

After nailing together the pieces, you could apply paint with color of your choice. For me, I have nailed  cast Acrylic to the wood for a nicer finish as well as provide a little bit of water resistance. But do be aware the arylic can crack easily, so do handle with care.


To end off this post, I would like to highlight the following:
  • You will still need to make 4 marker poles to mark the corner of the jumps. The poles should not be attached to the jump and i would recommend simple stake in the ground poles.
  • I would suggest that marker poles to be at least 4ft tall and at 20mm thick poles or less
  • Because my dog jump at 4 planks, i only made 4 planks instead of 5 shown in the drawing above
  • If you have a toy dog jumping only 1 plank, use the second lowest planks instead of the lowest if you training for USDAA.